I've used Claude Code and Codex daily since they came out. Here are the best practices, tools, and configuration patterns that work for me. Most of them apply to both coding agents.
TL;DR
My opinionated setup for Claude Code and Codex:
https://github.com/vinta/hal-9000
CLAUDE.md
The Global CLAUDE.md
Your ~/.claude/CLAUDE.md should only contain:
- Your preferences and rules to correct agent behavior
- You probably don't need to tell it YAGNI or KISS as bare principles. They're already built in.
Pro tip 1: before adding something to CLAUDE.md, ask it, "Is this already covered in your system prompt?"
Pro tip 2: try my refactor-claude-md or refactor-agents-md skill!
Here are some parts of my CLAUDE.md I found useful:
## Communication Style

- Before a non-trivial change (multiple files, new behavior), outline your approach in 3-5 bullets (what, in what order), then execute without asking. For a small edit, one sentence of intent is enough
  - When a bullet is a choice, name the option not taken and why, so we can backtrack if the pick fails
- Ask with the AskUserQuestion tool whenever the answer is a selection rather than a sentence, so the user clicks an option instead of typing
  - Selections: multiple-choice, yes/no (whether gating next steps or offering optional follow-up work), picking from a list, choosing between approaches
  - Holds inside skills: a skill that prescribes its own question format decides what you ask, not how

### Push Back With Evidence

- Before agreeing with a plan or proposal ("should we...", "how about...", "does this make sense?"), look for one concrete failure case. Report it, or say none was found. Both are valid answers; silent agreement is not. First-person framing pulls the most agreement, so restate it as a neutral question (what breaks if we do X?) and answer that
- Push back with evidence, not opinion: a failing input, a file, a test run, or a fetched doc that contradicts the claim. "This seems fragile" is not pushback
- Propose the simpler alternative when one exists

### Surface Assumptions

Name each assumption you resolved by guessing as its own bullet, so the user can catch what they forgot to tell you.

When the user asks for advice or a recommendation, first surface the assumptions their question takes for granted and the missing information that would change your answer (and how), so they can catch the framing they got wrong. End a recommendation with its weakest point.

## Workflow

- When a finding invalidates the approach you're executing (contradicts it, or makes it unnecessary), stop and lead with it: what it kills, what the plan is now. Mentioning it in passing while continuing does not count

### Prefer Online Sources

Training data goes stale: library/framework/SDK APIs, config keys, CLI flags, cloud services, platform features, syntax, and versions change, and guessing has repeatedly cost debugging round-trips.

Invoke the find-docs skill BEFORE writing code or config that touches any of those, and BEFORE answering questions about them. Being about to write such code is trigger enough, even when no question was asked. Confidence is not an exemption, and neither is the library being well known. Answering from training data, or fetching a remembered docs URL instead of invoking the skill, does not satisfy this rule. For topics find-docs covers poorly, WebFetch the official docs instead of falling back to training data.

If the user provides URLs, WebFetch each one as a primary source before searching further.
Also see:
The Project CLAUDE.md
For project-specific instructions, put them in the project-level CLAUDE.md.
The highest-signal content in your project CLAUDE.md (or any skill) is the Gotchas section. Build these from the failure points Claude Code actually runs into.
Also see:
Per File Type Rules
For language-specific or per-file rules, put them in ~/.claude/rules/, so Claude Code only loads them when editing those file types.
For instance, ~/.claude/rules/python.md:
---
paths:
  - "**/*.{ts,tsx}"
  - "**/*.{js,jsx}"
  - "**/package.json"
---

# TypeScript/JavaScript

- Pin exact dependency versions in package.json — no ^ or ~ prefixes
- Pin @types/node to the latest release of the oldest Node.js major in engines.node, so the compiler flags APIs that major lacks
- Use the node: prefix for Node.js built-in modules (node:fs, node:path)
- Prefer interface over type for object shapes (extendable, better error messages)
- Avoid enums. Use union types (type Status = 'active' | 'inactive') or as const objects
- Write a proper type instead of any or a cast (as any, as unknown). For a genuinely untypable value, use unknown and narrow it; any is the last resort
- Do not add explicit return types. Let TypeScript infer them, except where the annotation checks returned literals against a declared union or contract

## Naming

Every name you pick, in code or in a proposal, passes every bullet here before it lands. An existing name that fails a bullet is not precedent to copy, and not a rename in this change; report it as a follow-up.

- **One value has one name everywhere it appears**. When two records carry the same value under two names, rename to the one that already matches the domain vocabulary
- An identifier mirrors its domain type name (lateFixes: LateFix[], ambiguousShape: AmbiguousShape), never a shortened synonym. This covers parameters, loop variables, and destructured locals
- An action is the bare verb, the gerund is the noun or modifier: spaceText(), spacingMode. A predicate about whether to act takes the verb (shouldAutoSpace); a predicate about the concept's state keeps the noun (hasProperSpacing). Feature names stay as their ADR spells them (applyAiSpacing)
- Name a field or local by its state (unspaced, settled), never by relative position (before, after) or by mechanism (pending, unflushed). One thing at two moments is two types, never one type with optional later-moment fields
- Prefer the concrete compound that names the visible thing and matches existing code over an abstract or mechanism noun: AmbiguousShape, not Ambiguity
- A transport noun (Message, Request, Response) belongs to the envelope only; the payload is named by what it is: Candidate, not ClassifyRequest
- A result type is the noun of the verb that produces it: decideBoundarySpacing() returns BoundarySpacingDecision, not BoundarySpacingVerdict
- A callback is named by what changed, never by the container the event came in: onTextNodesSettled(settledTextNodes), not onBatchSettled
- A wrapped function keeps the verb first and the wrapper as a suffix: spaceTitleDebounced, not debouncedSpaceTitle
- A per-item helper beside its batch function is verbOneNoun (classifyCandidates / classifyOneCandidate, registerContentScripts / registerOneContentScript): the bare singular differs by one trailing s and reads alike in a diff. Keep the batch name as is when a message or API shares it
The full rules I have:
Output Styles
Claude Code provides a built-in method to modify the system prompt to change how Claude responds: Output styles. You can also write your own. For instance, my Say no more, inspired by caveman, so every reply drops articles, filler, and pleasantries while keeping every technical detail:
---
name: Say no more
description: Nudge nudge. Know what I mean? Say no more
keep-coding-instructions: true
---

Write telegraphically, as if every word cost money. All technical substance stays. Only fluff dies.

## Rules

### Shape

Lead with the answer. The first sentence carries the verdict or result; the reason comes after, never before.
Pattern: [thing] [action] [reason]. [next step].
State each fact once; never restate the same fact in a second form.

### Cut

Use one word when one word is enough.
Remove all mannered prose.
Prefer the common word over the literary one (name, not coin; only, not solely).
Drop articles (a/an/the), filler (just/really/basically/actually/simply), pleasantries (sure/certainly/happy to), hedging, decorative tables and emoji, and causal arrows (→).
Fragments are fine. Use short synonyms (fix, not "implement a solution for"). Standard acronyms are fine (DB/API/HTTP).

### Keep exact

Never drop not/never/no/only/except: a flipped meaning is worse than any token saved.
Keep numbers, units, and technical terms exact. Never invent abbreviations (cfg/impl/req/res/fn).
Code blocks, commands, API names, and error strings stay byte-exact, never compressed. For a long error log, quote the shortest decisive line, not the whole dump.

### Example

Not: "Sure! I'd be happy to help. The issue is most likely caused by your auth middleware not validating token expiry."
Yes: "Bug in auth middleware. Token expiry check use < not <=. Fix:"

### Agentic turns

Fire tool calls directly, with no progress narration before or between calls.
CLAUDE.md duties survive compressed, never dropped: pre-change outline bullets, named-assumption bullets, and findings the user needs. Write them telegraphically too.
Why an output style instead of the global CLAUDE.md? They land in different places: an output style becomes part of the system prompt, and Claude Code periodically reminds the model to stick to it mid-conversation, while CLAUDE.md gets injected as a user message, where it competes with all your other rules. Plus, you can switch styles in /config without touching your global rules.
One gotcha: output styles apply to the main session only.
Also see:
Configurations
Settings
There are some useful configurations you could set in your ~/.claude/settings.json:
{
  "$schema": "https://json.schemastore.org/claude-code-settings.json",
  "env": {
    "CLAUDE_CODE_EXPERIMENTAL_AGENT_TEAMS": "1",
    "CLAUDE_CODE_SUBAGENT_MODEL": "opus"
  },
  "permissions": {
    "allow": ["..."],
    "deny": ["..."],
    "ask": ["..."],
    "defaultMode": "auto"
  },
  "model": "claude-fable-5-1[1m]",
  "effortLevel": "high",
  "advisorModel": "fable",
  "teammateMode": "auto",
  "voice": {
    "enabled": true
  },
  "includeGitInstructions": false,
  "cleanupPeriodDays": 999999
}
Highlights:
"CLAUDE_CODE_EXPERIMENTAL_AGENT_TEAMS": "1": Enable Agent Team feature, a fancy way to consume a huge amount of tokens"permissions.defaultMode": "auto": Use this to pretend it's safer than --dangerously-skip-permissions"advisorModel": "fable": Use something faster like sonnet as the main model, and let it consult fable when needed"includeGitInstructions": false: Remove built-in commit/PR instructions and git status snapshot from the system prompt, since my commit skill covers that"cleanupPeriodDays": 999999: By default, your chat history (location: ~/.claude/projects/) will be deleted after 30 days"voice": { "enabled": true }: Enable Voice Dictation feature. Code like a boss!
I turned all this settings-tweaking into a skill: audit-claude-settings fetches the latest settings and env-vars from official docs, diffs them against your actual config, and suggests changes tied to how you work.
The full settings I use:
Permissions
If you're not using a sandbox or devcontainer for Claude Code, you may want to block some evil commands in your ~/.claude/settings.json:
{
  "permissions": {
    "defaultMode": "auto",
    "deny": [
      "Read(~/.aws/**)",
      "Read(~/.config/**)",
      "Read(~/.docker/**)",
      "Read(~/.dropbox/**)",
      "Read(~/.gnupg/**)",
      "Read(~/.gsutil/**)",
      "Read(~/.kube/**)",
      "Read(~/.npmrc)",
      "Read(~/.orbstack/**)",
      "Read(~/.pypirc)",
      "Read(~/.ssh/**)",
      "Read(~/*_history)",
      "Read(~/**/*credential*)",
      "Read(~/Library/**)",
      "Edit(~/Library/**)",
      "Read(~/Dropbox/**)",
      "Edit(~/Dropbox/**)",
      "Read(//etc/**)",
      "Edit(//etc/**)",
      "Bash(git -c *)",
      "Bash(git --config-env*)",
      "Bash(git --git-dir*)",
      "Bash(gh repo delete *)",
      "Bash(su *)",
      "Bash(sudo *)",
      "Bash(passwd *)",
      "Bash(env *)",
      "Bash(printenv *)",
      "Bash(history *)",
      "Bash(fc *)",
      "Bash(eval *)",
      "Bash(exec *)",
      "Bash(rsync *)",
      "Bash(sftp *)",
      "Bash(telnet *)",
      "Bash(socat *)",
      "Bash(nc *)",
      "Bash(ncat *)",
      "Bash(netcat *)",
      "Bash(nmap *)",
      "Bash(chflags *)",
      "Bash(xattr *)",
      "Bash(diskutil *)",
      "Bash(mkfs *)",
      "Bash(security *)",
      "Bash(defaults *)",
      "Bash(launchctl *)",
      "Bash(osascript *)",
      "Bash(dscl *)",
      "Bash(networksetup *)",
      "Bash(scutil *)",
      "Bash(systemsetup *)",
      "Bash(pmset *)",
      "Bash(crontab *)"
    ],
    "ask": [
      "Bash(open *)",
      "Bash(chmod *)",
      "Bash(chown *)",
      "Bash(kill *)",
      "Bash(killall *)",
      "Bash(pkill *)",
      "Bash(curl *-d *)",
      "Bash(curl *--data*)",
      "Bash(curl *--json *)",
      "Bash(curl *-F *)",
      "Bash(curl *--form *)",
      "Bash(curl *-T *)",
      "Bash(curl *--upload-file *)",
      "Bash(curl *-H *)",
      "Bash(curl *--header *)",
      "Bash(brew install *)",
      "Bash(pip install *)",
      "Bash(uv pip install *)",
      "Bash(uv tool install *)",
      "Bash(uv add *)",
      "Bash(npm install *)",
      "Bash(npm i *)",
      "Bash(yarn add *)",
      "Bash(pnpm add *)",
      "Bash(bun add *)",
      "Bash(git push *)",
      "Bash(git remote add *)",
      "Bash(git remote set-url *)",
      "Bash(git config remote.*)",
      "Bash(git config * remote.*)",
      "Bash(gh repo create *)",
      "Bash(gh repo rename *)",
      "Bash(gh *--admin*)",
      "Bash(gh api *-X *)",
      "Bash(gh api *--method *)"
    ]
  },
  "hooks": {
    "PreToolUse": [
      {
        "matcher": "Bash",
        "hooks": [
          {
            "type": "command",
            "command": "python3 ~/.claude/hooks/guard-bash-paths.py"
          },
          {
            "type": "command",
            "command": "python3 ~/.claude/hooks/guard-network-egress.py"
          }
        ]
      }
    ]
  }
}
Rule precedence catches people out: Claude Code evaluates deny, then ask, then allow, and the first match wins — specificity never reorders them. So a narrow "allow": ["Bash(curl https://code.claude.com/docs/*)"] does nothing while "ask": ["Bash(curl *)"] is present, and a PreToolUse hook returning allow doesn't rescue it either, since a matching ask rule still prompts. Bash patterns have no negation, so carving an exception out of a broad ask rule means narrowing the ask rule itself.
Also, "deny": ["Read(~/.aws/**)", "Read(~/.kube/**)", ...] alone is not enough, since Claude Code can still read sensitive files through the Bash tool. You can write a simple hook to intercept Bash commands that access blocked files, like this guard-bash-paths.py hook. However, Claude Code can still write scripts to read sensitive data and bypass all of the above defenses. The safest approach is using a sandbox after all.
Plugins
Claude Code Plugins are simply a way to package skills, commands, agents, hooks, MCP servers, LSP servers, and monitors. Distributing them as a plugin has the following advantages:
- Auto update (versioned releases)
- Auto hooks configuration (users don't need to edit their
~/.claude/settings.json manually)
- Skills have a
/plugin-name:your-skill-name prefix (no more conflicts)
To install a plugin, you need to add a marketplace first. A marketplace is usually just a GitHub repo. Think of it as a namespace.
# Claude Code
/plugin marketplace add vinta/hal-9000
/plugin install hal-skills@hal-9000

/plugin marketplace add mattpocock/skills
/plugin install mattpocock-skills@mattpocock

# Codex
codex plugin marketplace add vinta/hal-9000
codex plugin add hal-skills@hal-9000

codex plugin marketplace add DietrichGebert/ponytail
codex plugin add ponytail@ponytail
Recommended:
Skills
Skills can contain executable scripts and hooks, not just Markdown. Use with caution! When in doubt, have your agent review them first.
Here are skills I've used, mostly installed per project when needed:
# my skills
npx skills add https://github.com/vinta/hal-9000 \
--skill commit \
--skill pr \
--skill fuck-over-engineering \
--skill best-practices \
--skill blindspot \
--skill simple-english \
--skill write-like-me \
--skill audit-claude-settings \
--skill refactor-claude-md \
--skill refactor-agents-md \
--skill refactor-memory \
--skill refactor-skill \
--skill update-allowed-tools \
--agent codex \
-g

# workflow skills
npx skills add https://github.com/mattpocock/skills \
--skill code-review \
--skill codebase-design \
--skill diagnosing-bugs \
--skill domain-modeling \
--skill grill-me \
--skill grill-with-docs \
--skill grilling \
--skill handoff \
--skill implement \
--skill improve-codebase-architecture \
--skill prototype \
--skill research \
--skill tdd \
--skill teach \
--skill to-spec \
--skill to-tickets \
--skill wait-what \
--skill wayfinder \
--skill writing-for-agents \
--agent codex \
-g

# doc skills
npx skills add https://github.com/upstash/context7 --skill find-docs --agent codex claude-code -g
npx skills add https://github.com/humanlayer/skills --skill show-me --agent codex claude-code -g

# language skills
npx skills add https://github.com/dagster-io/skills --skill dignified-python
npx skills add https://github.com/cursor/plugins --skill typescript-best-practices
npx skills add https://github.com/JetBrains/go-modern-guidelines --skill use-modern-go

# backend skills
npx skills add https://github.com/vintasoftware/django-ai-plugins
npx skills add https://github.com/google/skills
npx skills add https://github.com/cloudflare/skills
npx skills add https://github.com/planetscale/database-skills
npx skills add https://github.com/supabase/agent-skills

# frontend skills
npx skills add https://github.com/millionco/react-doctor
npx skills add https://github.com/vercel-labs/agent-skills
npx skills add https://github.com/vercel-labs/next-skills

# design skills
npx skills add https://github.com/pbakaus/impeccable
npx skills add https://github.com/emilkowalski/skills

# video skills
npx skills add https://github.com/remotion-dev/skills
npx skills add https://github.com/AmanVarshney01/tcut

# browser skills
npx skills add https://github.com/microsoft/playwright-cli --agent codex claude-code -g

npx skills list -g
npx skills update -g
npx skills remove --all -g
Recommended:
/wayfinder from mattpocock: Let AI ask you a lot of questions until you get annoyed/find-docs from context7: Find the latest documentations/best-practices from hal-9000: Find best practices and common gotchas for any topic/fuck-over-engineering from hal-9000: Cut over-engineered code
You can find more skills on skills.sh.
MCP Servers
You probably don't need any MCP servers if you can do the same thing with CLI + skills.
Context7 MCP
No, just use the ctx7 CLI with find-docs skill instead.
npm install -g ctx7
npx skills add https://github.com/upstash/context7 --skill find-docs --agent codex claude-code -g
Playwright MCP
No, you should use the playwright-cli skill instead. The tool supports headed mode (the opposite of headless), if you'd like to see the browser.
npm install -g @playwright/cli
playwright-cli install-browser
npx skills add https://github.com/microsoft/playwright-cli --skill playwright-cli --agent codex claude-code -g
GitHub MCP
No, you should use the gh command instead.
brew install gh
Hooks
Both Claude Code and Codex support hooks. Hooks make Claude Code run specific commands on lifecycle events like SessionStart, UserPromptSubmit, and PreToolUse.
Instead of reminding Claude Code to run the linter or tests in your prompts (and it still forgets sometimes), just write a PostToolUse hook that runs deterministically:
{
  "hooks": {
    "PostToolUse": [
      {
        "matcher": "Write|Edit",
        "hooks": [
          {
            "type": "command",
            "command": "uv run ruff check . >&2 || exit 2",
            "if": "Edit(**/*.py)",
            "timeout": 30,
            "statusMessage": "Linting Python code..."
          }
        ]
      }
    ]
  }
}
It's worth noting that only exit code 2 blocks and feeds the output back to Claude, and only through stderr — while tools like ruff and ty print their diagnostics to stdout. A bare uv run ruff check . exits 1, a non-blocking error, so Claude only gets the first line of stderr, never the lint errors. >&2 moves them to the stream Claude reads, and || exit 2 makes the hook actually block.
Also, do the path matching in if, not inside a wrapper script. if takes the same permission rule syntax.
I also wrote some Claude Code plugins that use hooks:
For example, hal-session-auto-rename. Since Claude can message your other Claude Code sessions by name (you could also explicitly mention them with @session-name), a good session name actually matters. I found Claude Code already titles every session once, from its first real prompt, and stores it in the transcript, so I just wired that up to a UserPromptSubmit hook, which can set sessionTitle.
Useful Tips
Prompt Best Practices
Command Aliases
# in ~/.zshrc
alias cc="claude"
alias ccmax="claude --model fable --effort max"
alias ccfable="claude --model fable"
alias ccopus="claude --model opus"
alias ccsonnet="claude --model sonnet"
alias ccyolo="claude --dangerously-skip-permissions"
ccp() { claude --model sonnet --effort high --safe-mode --no-session-persistence --no-chrome -p "$*"; }

alias cx='codex'
alias cxultra='codex --model gpt-6-astra --config model_reasoning_effort=ultra'
alias cxyolo='codex --dangerously-bypass-approvals-and-sandbox'
Use ccp for ad-hoc prompts:
ccp "commit"
ccp "list all .md in this repo"
Customize Your Statusline
Claude Code has a customizable statusline at the bottom of the terminal. You can run any script that outputs text.
Mine shows the current model, the current working folder, the git branch, and a grammar-corrected version of my last prompt (because my English needs all the help it can get). The grammar correction runs an ad-hoc claude command inside the statusline script.
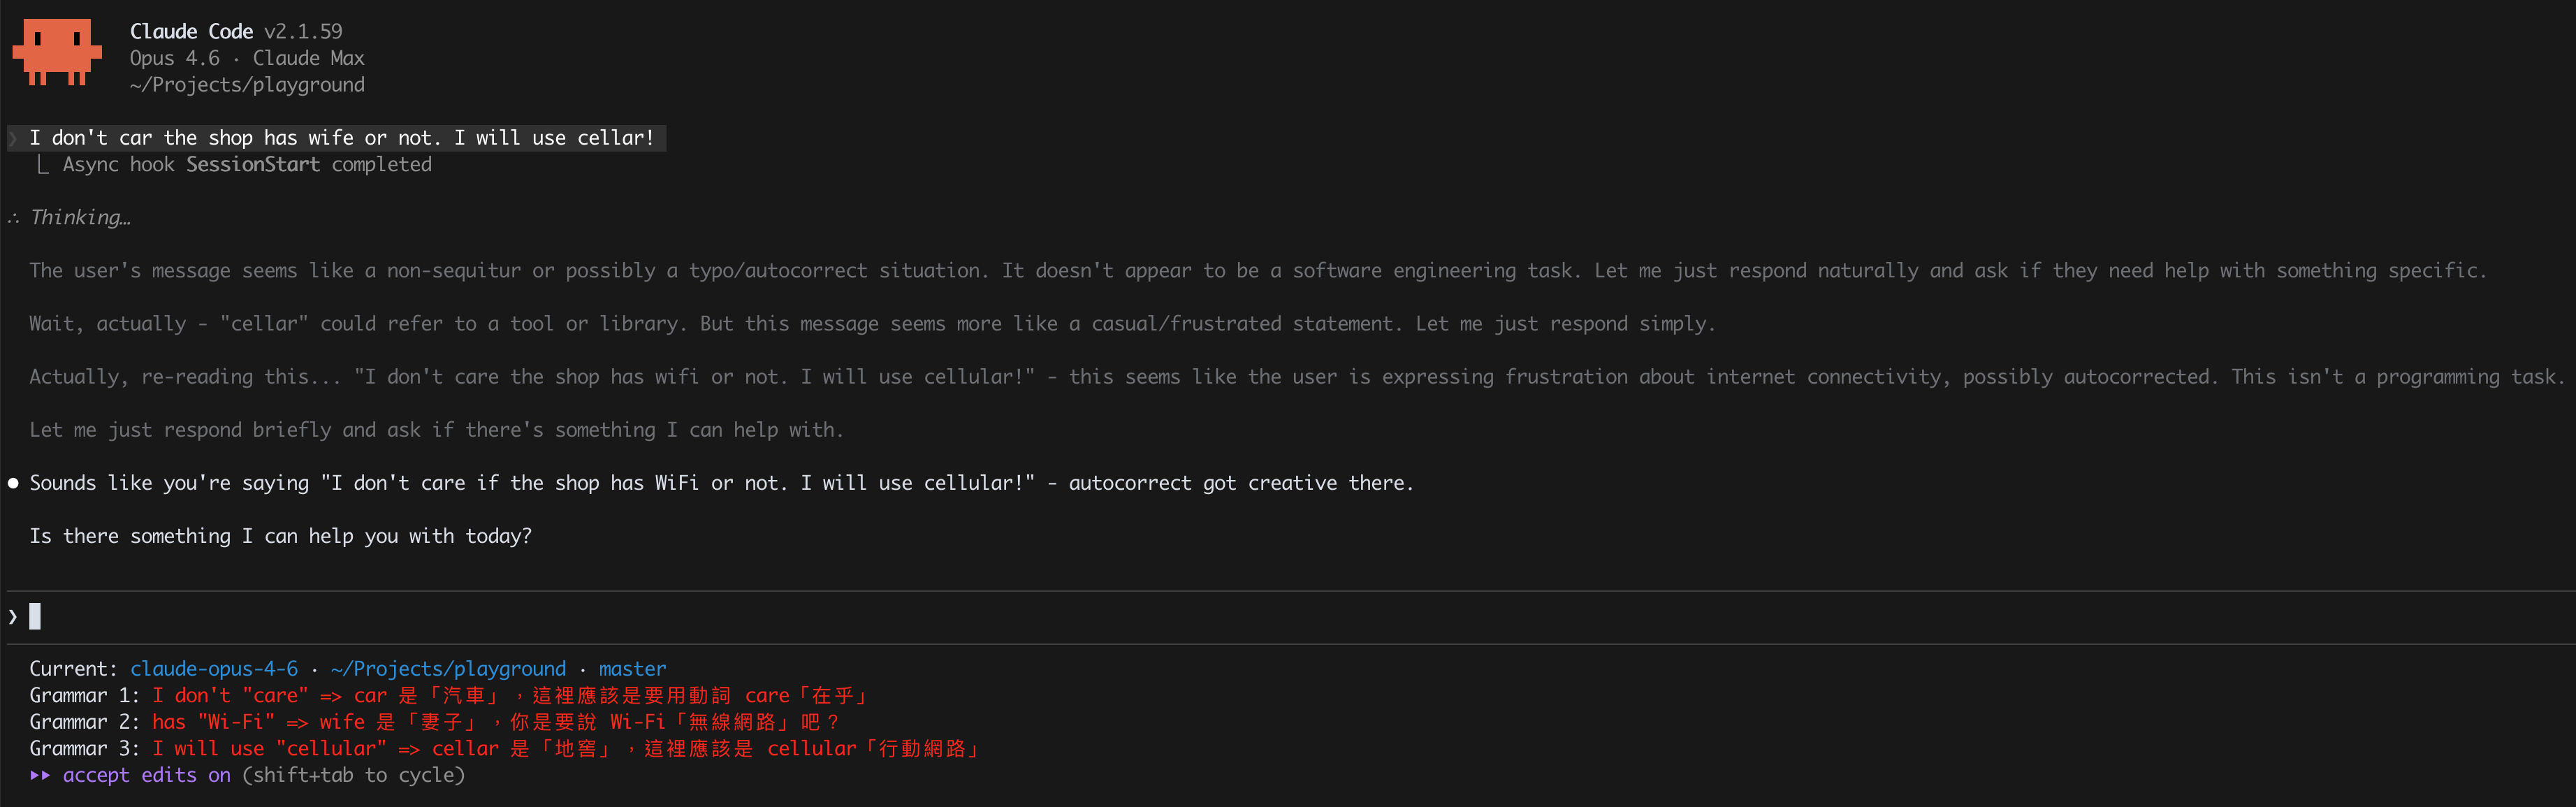
Run Ad-Hoc Claude Commands Inside Scripts
You can invoke claude as a one-shot CLI tool from hooks, statusline scripts, CI, or anywhere else. The trick is using the right flags to get a clean, isolated call with zero side effects:
cmd = """
    claude
    --model haiku
    --max-turns 1
    --setting-sources ""
    --tools ""
    --disable-slash-commands
    --no-session-persistence
    --no-chrome
    --safe-mode
    --print
"""

result = subprocess.run(
    [*shlex.split(cmd), your_prompt],
    capture_output=True,
    text=True,
    timeout=15,
    cwd="/tmp",
)
What each flag does:
--setting-sources "": don't load hooks (avoids infinite recursion if called from a hook)--no-session-persistence and cwd="/tmp": avoid polluting your current context--tools "": no file access, no bash, pure text in/out--no-chrome: skip the Chrome integration--safe-mode: prevent loading CLAUDE.md, skills, plugins, MCP, or auto-memory